
If the plug is only rounded on the outside, you can often remove it at home with the right grip tools. If oil is actively dripping or the plug spins freely without resistance, stop driving immediately and get a professional repair before you do engine damage that costs far more than a drain plug fix.
Two immediate steps:
- Check for an active leak. Slide a drain pan or a piece of cardboard under the vehicle and look for drips. Even a slow seep matters.
- Check your oil level. Pull the dipstick before you start anything. If the level is low, do not run the engine until you add oil or get the vehicle to a shop.
Pro Tip: Take a photo of the plug and the underside of the pan right now. A clear image saves time at the shop and creates a baseline if there is any dispute about pre-existing damage.
Key Takeaways
A stripped oil drain plug is fixable at home when the damage is limited to the plug head, but stripped pan threads require a permanent repair, either a Time-Sert insert or pan replacement, to avoid repeat failures.
| Point | Details |
|---|---|
| Stop driving if oil is leaking | An active leak or freely spinning plug means engine damage risk; do not drive until secured. |
| Try low-force methods first | Rubber strap wrenches and bolt extractors often remove a rounded plug without pan damage. |
| Prefer Time-Sert for thread repair | Time-Sert solid sleeve inserts resist backing out in oil; they are the more durable insert option. |
| Budget realistically | Costs range from under $25 for a simple plug swap to several hundred dollars for pan replacement. |
| Kwik Kar for Irving drivers | Kwik Kar’s ASE-certified technicians perform DVI inspections with photos and provide written estimates before any drain plug repair begins. |
Table of Contents
- Can you drive with a stripped oil drain plug?
- How to tell what is actually stripped
- Removal methods from least to most invasive
- Step-by-step DIY removal for a rounded drain plug
- Permanent and temporary thread-repair options
- What does it actually cost to fix a stripped drain plug?
- When to stop DIY and call a professional
- How to avoid stripping the drain plug again
- How to reinstall the drain plug correctly after a repair
- Kwik Kar handles stripped drain plug repairs in Irving, TX
- Sources
- FAQ
Can you drive with a stripped oil drain plug?
Short answer: maybe a few blocks to a safer location, but not across town.
A plug that is snug and only slightly rounded on the hex head is not an emergency. One that is loose, weeping oil, or spinning freely is. The difference matters because a running engine can lose its entire oil supply in minutes if the plug backs out completely.
How to read the situation:
- No visible drip, plug feels tight: You can likely drive to a nearby shop the same day. Check oil level first and watch the oil pressure gauge.
- Slow seep or wet residue around the plug: Drive only as far as absolutely necessary. Keep trips under five miles and recheck the level before each one.
- Active drip or plug visibly loose: Do not drive. Secure the vehicle, place a drain pan underneath, and call a shop or arrange a tow.
- Oil pressure warning light on: Shut the engine off immediately. Driving with low oil pressure can destroy rod bearings in under a minute.
Pro Tip: Check your driveway or parking spot for oil spots each morning. A quarter-sized spot that appears overnight is a reliable early warning sign before a seep becomes a full leak.
How to tell what is actually stripped
The repair path depends entirely on where the damage is, so a quick diagnosis before you grab any tools is worth two minutes of your time.
What you are looking for:
- Rounded hex head. The plug is intact and still in the pan, but the corners of the hex are worn smooth. A standard socket slips off. The threads in the pan are likely fine.
- Plug spins without resistance. Turn it by hand. If it rotates freely without tightening or loosening, the threads in the pan are damaged, not just the plug head.
- Plug backs out on its own. The pan threads are stripped enough that the plug cannot hold torque. This is the most serious scenario.
- Plug tightens before it seats. This is the classic sign of a cross-threaded drain plug. Stop tightening immediately. Forcing it further destroys the pan threads.
A useful test: try threading a longer bolt of the same diameter and pitch into the hole by hand. If it catches and threads in smoothly past the damaged surface threads, the deeper threads may still be usable, and a longer replacement bolt could restore a seal without more invasive work.
Use a mirror or your phone camera to get a clear look at the hole. Photograph what you see. If you take the vehicle to a shop, those photos help the technician quote the job accurately before they even lift the car.
Removal methods from least to most invasive
Try the lowest-risk option first. Escalate only when the previous method fails.
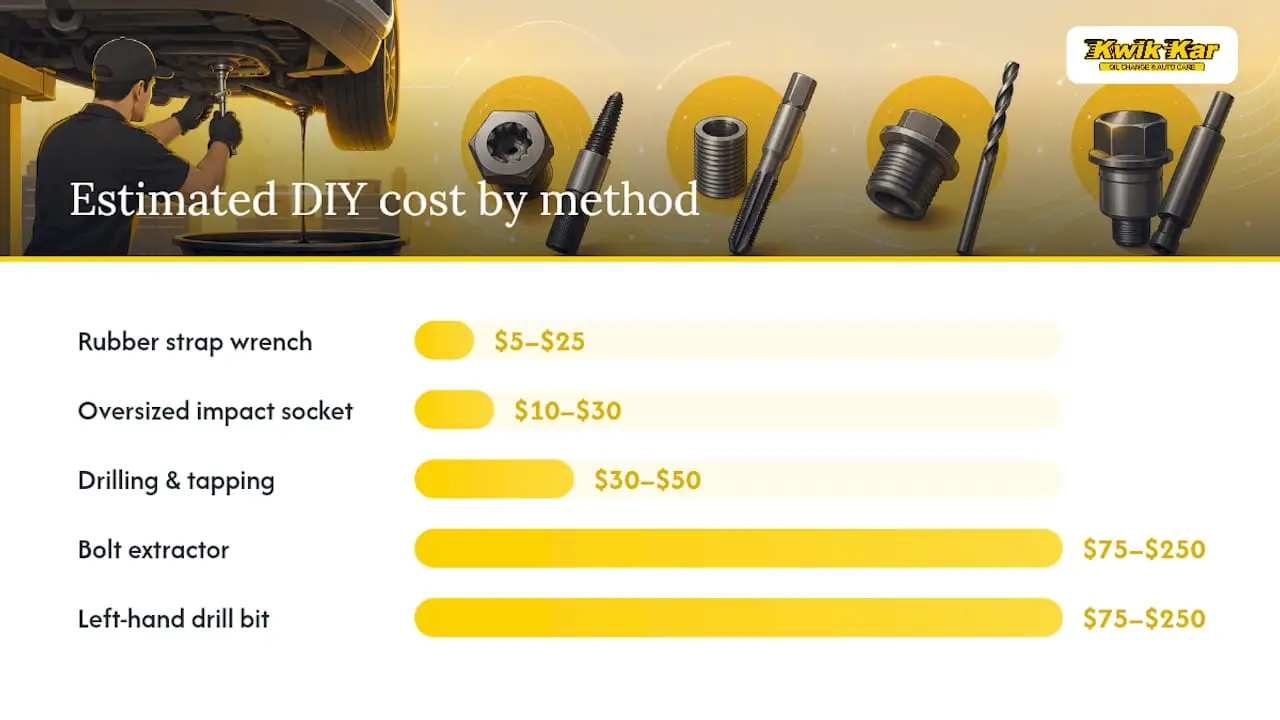
| Method | Effort | Risk to Pan | Estimated DIY Cost | Success Likelihood |
|---|---|---|---|---|
| Rubber strap wrench / locking pliers | Low | Very low | $5–$25 | Good for rounded heads |
| Oversized impact socket (Irwin Bolt-Grip) | Low | Very low | $10–$30 | Good for moderately rounded |
| Bolt extractor / Easy-Out set | Medium | Low | $75–$250 | Good for most rounded plugs |
| Left-hand drill bit | Medium | Low-medium | $75–$250 | Good when extractor fails |
| Weld-a-nut technique | Medium-high | Low if done carefully | Welder required | Good for experienced users |
| Drilling and tapping (re-thread) | High | Medium-high | $30–$50 in tools | Works but risks shavings |
| Oil pan removal | Very high | None (pan is off) | $5–$25 in parts | Definitive |
Safety notes on drilling and tapping: Aluminum shavings in the oil are a real hazard. Shops typically remove the oil pan before drilling or tapping so cutting debris can be contained and cleaned rather than circulated through the engine. If you drill with the pan in place, pack the hole with grease before cutting to capture chips, and flush the system thoroughly afterward.
The weld-a-nut technique works well when you have access to a MIG welder. Weld a spare nut onto the rounded plug head, let it cool, then turn it out with a wrench. The heat from welding often breaks the corrosion bond that was making the plug difficult to remove in the first place.
Step-by-step DIY removal for a rounded drain plug
What you need
- Bolt extractor set (Easy-Out style, sized for your plug diameter, typically 14mm–18mm)
- Locking pliers (Channellock or Irwin Vise-Grip)
- Rubber strap wrench
- Breaker bar or ratchet with appropriate drive
- Drain pan (at least 2-gallon capacity)
- Jack stands (never use a floor jack alone)
- Nitrile gloves and safety glasses
- Shop rags and a plastic bag for contaminated materials
The procedure
- Warm the engine for two minutes, then shut it off. Slightly warm oil drains faster, and mild heat can help break a corroded plug free. Do not work on a hot engine.
- Lift and secure the vehicle on jack stands. Never crawl under a vehicle supported only by a floor jack.
- Position the drain pan under the plug.
- Try the rubber strap wrench first. Wrap it around the plug head and turn counterclockwise. This works surprisingly often on lightly rounded plugs.
- If that fails, try locking pliers. Grip the plug as tightly as possible and apply steady counterclockwise pressure. Avoid jerking.
- Move to a bolt extractor. Select the extractor size that fits snugly over the plug. Tap it on with a hammer so the reverse-spiral teeth bite into the metal. Turn counterclockwise with a breaker bar. Apply firm, steady pressure.
- If the plug spins freely and will not catch, do not force it. A freely spinning plug means the pan threads are gone. Stop here and take the vehicle to a shop.
- Once the plug is out, inspect the pan threads with a flashlight. If they look intact, try threading a new plug by hand. If it threads in smoothly and seats, you may be fine with a new plug and crush washer. If not, move to a thread repair.
AutoZone’s DIY guidance reinforces the same principle: start with low-force methods, use properly sized extractors, and avoid improvised glue or epoxy fixes that contaminate the oil.
Oil disposal: Pour used oil into a sealed container (the old oil jug works well) and take it to any AutoZone, O’Reilly, or participating shop for free recycling. Do not pour it down a drain or onto the ground. Contaminated shop rags go into a sealed plastic bag for disposal per your local hazardous waste guidelines.
Permanent and temporary thread-repair options
Once the plug is out, you have a decision to make. The repair you choose here determines whether you are back in this situation in six months.
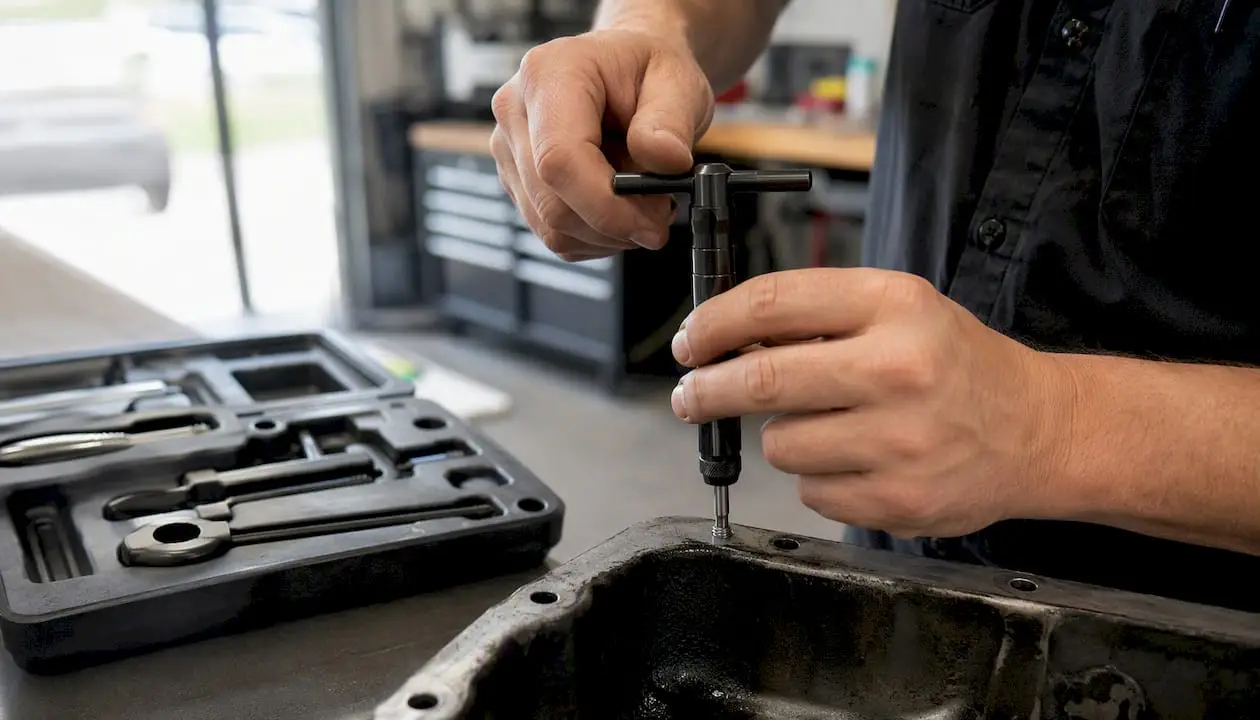
According to Rick’s Free Auto Repair Advice, there are two reliably permanent repairs: installing a Time-Sert insert or replacing the oil pan. Everything else is a temporary measure.
Time-Sert vs. Helicoil
Both are thread insert systems, but they behave differently in an oil pan environment. A Helicoil is a coiled wire insert that works well in many applications. A Time-Sert is a solid steel sleeve that bottoms out on a counterbored shoulder, which prevents it from backing out when submerged in oil. Many independent technicians prefer Time-Sert for drain plug repairs specifically because of that locking shoulder. The installation requires a dedicated Time-Sert kit for your thread size, but the result is essentially a new, stronger thread in the same location.
Longer replacement bolt
If the outer threads are damaged but the pan has deeper usable threads, a longer replacement bolt can sometimes restore a secure seal without any insert work. Thread the longer bolt in by hand first to confirm it catches before committing to this approach.
Temporary options and their limits
Rubber expandable plugs and universal drain plugs can stop an active leak long enough to drive to a shop. They are not a long-term solution. Oversized self-tapping plugs cut their own threads and can work for a season, but they weaken the remaining aluminum with each removal. JB Weld, silicone, and tape-based fixes fail under heat and oil pressure. Skip them entirely.
Oil pan replacement
When the pan threads are too far gone for an insert, or when the pan flange is cracked, replacement is the cleanest fix. Labor drives the cost because the pan must come off, the gasket replaced, and the system refilled. On many front-wheel-drive vehicles, the pan is accessible enough that a shop can complete the job in two to three hours.
What does it actually cost to fix a stripped drain plug?
Costs vary by method, vehicle, and how much labor the access requires. Repair costs range from low hundreds for simple repairs up to several hundred dollars for insert installations or pan replacement, with labor time being the primary driver.
Rough ranges to budget against:
- New plug and crush washer (threads intact): $5–$25 in parts, minimal labor if done during an oil change
- Time-Sert or Helicoil insert installation: $75–$250 at a shop, depending on whether the pan needs to come off
- Oversized plug (temporary): $10–$30 in parts
- Oil pan replacement: $200–$600+ depending on the vehicle, with labor accounting for the majority of that figure
A few things that push the price up: aluminum pans on low-clearance vehicles, stripped flanges that require gasket replacement, and shops that charge a diagnostic fee before quoting. Ask for a written estimate before any work begins. A shop that sends you a Digital Vehicle Inspection with photos before calling you with a price is showing you exactly what they found, which removes the guesswork from the conversation.
Bundling the repair with a full oil change and inspection during the same visit saves a return trip and often reduces the total labor charge.
When to stop DIY and call a professional
Some situations are genuinely beyond what a socket set and a Saturday afternoon can fix. Recognizing those early saves you from turning a $150 repair into a $600 one.
Stop and call a shop when:
- The plug spins freely with no resistance and oil is dripping
- The pan flange or surrounding metal is visibly cracked or deformed
- The plug location is inaccessible without removing a subframe or skid plate
- You do not have jack stands or a safe way to lift the vehicle
- You have already tried two extraction methods and the plug will not move
- The oil pressure warning light has come on
What a professional shop will do:
- Assess whether the pan threads can accept an insert or need full replacement
- Remove the pan if drilling or tapping is required, to prevent metal shavings from entering the engine
- Install a Time-Sert insert or replace the pan with a new gasket
- Perform a full oil service and top-off after the repair
- Check for secondary damage from oil loss, including a quick engine diagnostic
What to ask for at the shop:
- Proof of ASE-certified technicians on staff
- A Digital Vehicle Inspection with photos and video sent to your phone before work begins
- A written estimate with line-item pricing before they start
- Warranty terms on the repair
Pro Tip: Asking for a DVI upfront is not being difficult. It is standard practice at any shop worth your business. The photos document the vehicle’s condition before the repair, which protects both you and the shop.
How to avoid stripping the drain plug again
The most common cause of a stripped drain plug is overtightening, usually with an impact wrench set too high or a technician skipping a torque wrench entirely.
Concrete habits that prevent recurrence:
- Use a torque wrench every time. Most drain plugs on aluminum pans torque to a moderate tightening level recommended by the vehicle manufacturer. Check your owner’s manual or a service database for your specific vehicle. Never use an impact gun to final-tighten a drain plug on an aluminum pan.
- Replace the crush washer at every oil change. A reused crush washer does not compress properly, which leads technicians to overtighten trying to stop a seep. New washer, every time.
- Use the correct plug. OEM spec or a direct-fit replacement. Universal plugs with slightly different thread pitches are a common source of cross-threading.
- Thread by hand first. Always start the plug by hand for at least three full turns before applying any tool. If it resists, stop and check the alignment.
- Consider a longer OEM-spec bolt before opting for inserts in shallow-thread cases where only the outer threads are damaged.
Pro Tip: Ask the shop to note the drain plug torque value on your service invoice. If a future technician overtightens it, you have documentation of the correct spec from the previous visit.
How to reinstall the drain plug correctly after a repair
Getting the plug back in is where many people create the problem they just fixed. Slow down here.
- Clean the threads in the pan. Use a clean rag and a thread chaser if available. Any debris or old sealant left in the hole can cause the new plug to cross-thread.
- Inspect the new plug. Confirm it is the correct thread pitch and diameter for your vehicle. A plug that looks close but is not exact will cross-thread.
- Install a new crush washer or sealing washer. Place it on the plug before threading.
- Thread in by hand. Start the plug by hand and turn it at least three to five full rotations before touching a wrench. It should turn smoothly with no resistance. Any binding means stop and back it out.
- Snug it with a wrench. Once hand-tight, use a wrench to bring it to snug. You should feel the washer compress.
- Torque to spec. Use a torque wrench set to your vehicle’s specification (typically 20–30 ft-lbs for aluminum pans, but confirm your exact spec). Stop at the click. Do not go further.
- Fill with oil and check for leaks. Add the correct amount and type of oil, run the engine for two minutes, then shut it off and inspect the plug area for any seeping.
- Recheck after the first drive. After your first drive of five or more miles, park on a clean surface and check underneath. A dry plug after that first heat cycle is a good sign the seal is solid.
Kwik Kar handles stripped drain plug repairs in Irving, TX
Dealing with a stripped drain plug is one of those repairs where the wrong next move turns a $100 fix into a $500 one. Kwik Kar’s ASE-certified technicians in Irving diagnose the damage correctly the first time, whether that means a Time-Sert insert, a pan replacement, or simply a new plug and washer torqued to spec.

Every repair starts with a Digital Vehicle Inspection: photos and video of your vehicle’s condition sent directly to your phone, along with a written estimate before any work begins. You see exactly what the technician sees, and you approve the repair before it happens. No surprises on the invoice.
After the drain plug repair, Kwik Kar completes a full oil change service to refill and verify the system, so you leave with a sealed, properly filled engine. Check the current service specials for savings on your visit. Stop by or call to schedule your repair today.
Sources
These are the primary references behind the guidance in this article:
- Stripped Oil Drain Plug Repair: The Two Permanent Fixes — Ricks Free Auto Repair Advice
- Cross-Threaded Oil Drain Plug Solutions – NAPA KnowHow
- Is my oil pan drain stripped? – Mechanics Stack Exchange
- Stripped Oil Drain Plug Repair Costs – Cost Insider
FAQ
Can I drive with a stripped oil drain plug?
Only if the plug is snug and not leaking. If oil is dripping or the plug spins freely, stop driving immediately to avoid engine damage from oil loss.
How much does it cost to fix a stripped oil drain plug?
A simple plug and washer swap costs $5–$25 in parts. A Time-Sert insert installation typically runs $75–$250 at a shop, and pan replacement can reach several hundred dollars depending on the vehicle and labor time.
What should I do if I strip the drain plug?
Check for an active leak, place a drain pan under the vehicle, and check your oil level. Try low-force removal methods like a bolt extractor first; if the plug spins freely or oil is leaking, take the vehicle to a shop rather than forcing the repair.
How do you remove a rounded-off oil drain plug?
Start with a rubber strap wrench or locking pliers, then move to a bolt extractor set tapped firmly onto the plug head. If those fail, a weld-a-nut technique or left-hand drill bit are the next escalation steps before involving a professional.